Tuesday, 10 July 2012

ICING ON THE UNDERSIDE

We've been toying with a number of solutions for insulating our metal sheet roof. We've thought of polyester fibre rolls, blown in cellulose, and polystyrene. But all these options create problems in terms of difficulty of installation and continuity of thermal break. We finally settled on polyurethane foam spray. We found a local installer, PFC-Sprayfoam, and two days later, they were on site and working away. The whole job only took a few hours.

Basically, they arrive with a van containing the equipment, and a generator on a trailer behind. In simple terms, the spray foam is applied by mixing two chemical compounds, which react with each other and the atmosphere and begin expanding to many times their original volume. This applied foam hardens to an extremely effective closed cell insulating layer which is also completely watertight. It also [very importantly] renders the roof and its connections to the walls effectively airtight, eliminating drafts and associated heat loss/gain, something very critical to thermal performance which is often overlooked in roof structures.
The van, trailer, and heated pipe carrying the foam insulation
The generator, and the two drums of chemicals which make up the foam
The reactor which prepares and pumps the chemicals
 The van contains the 2 drums of chemical product, as well as a reactor which prepares the chemicals at the correct temperature. From here they were pumped separately along a 60m long heated hose into the house. The chemicals are only mixed in the spray nozzle as they are applied to the surface. The insulation as applied to the underside of our roof has made a massive impact on regulating the interior temperature of the house already. We intend to apply the polyurethane spray foam to the exterior surface of our brick walls as well, before they receive their cladding, in order to create a super-insulated house with a high internal thermal mass.
Application of the sprayfoam insulation begins
The finished product
We recommend this product without any reservations. It is the perfect solution for insulation your house's roof, while at the same time rendering it air and watertight. Contact Koos from PFC-Sprayfoam on +27(0)83 234 8978 for a quote. This product means you don't even need a membrane under you metal sheet or concrete tiled roof. The spray foam is applied and adheres directly to the underside of the roofing material, sealing every nook and cranny. Your roof space will become completely dust proof and air tight. Elegantly simple.

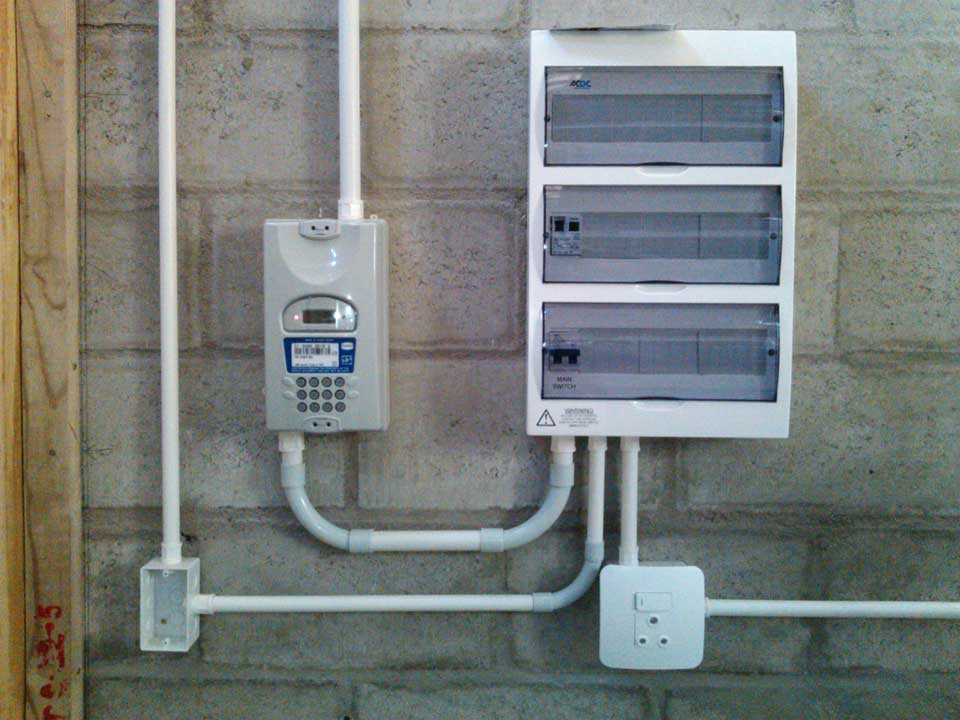
Since our last update we have also has the electricity finally connected up, with a pre-paid electicity meter installed by the utility, Eskom.
The start of the distribution board...
This is what our pre-paid electicity meter looks like
PS. The satellite dish has also gone up. Rather than a boring, generic eyesore in a prominent location, we decided to decorate the dish and spread a little sunshine to passers by. Hope you like it!
Smile!
Happy dish

Tuesday, 5 June 2012

WINDOWS!

It has been a while since our last update. But a few things have been done which make a huge difference to the house. First off, the site has been cleared of building rubble, and mostly levelled. Second, we have connected up most of the waste pipes and brought them into the building. Thirdly, our initial electrical installation is complete and ready for temporary certification, with the switch board and 1 socket circuit complete.

And last but definitely not least, our windows and doors are in! We have installed double glazed tilt-and-turn uPVC windows and sliding doors. They are manufactured locally from Turkish uPVC profiles and German locking hardware. The manufacturers, Tecnoplas, also make the double glazing units in-house. Although Tecnoplas appeared to have a few logistical problems, which caused very long delays in getting the windows installed, the end product is of a high quality and well worth the wait. Now that the building is closed up, we can finally commence with the interior fitout.
First part of the electrical intallation in the garage
Windows, electrics and poo-pipes on the south side
Is it my imagination, or does the front elevation......
....bear a striking resemblance to Henry the vacuum?
Sliding doors, windows, and front door on the north side
Tilt-and-turn windows: closed......
.......and open.

Wednesday, 25 April 2012

LONG TIME NO BLOG

Still no money is forthcoming from the b[w]ankers, so things are progressing at a very slow pace indeed. But we have managed to advance a couple of important tasks. First of these is the garage door. The installers, Doormatic, had it up in less than 2 hours. It is a sectional door, with 5 horizontal sections which are hinged to each other and slide up along a track. We'll have it automated at a later date. The steel door comes pre-finished in white over an alu-zinc coating for corrosion resistance. The external appearance of the door, with horizontal bandings, will match the appearance of the shiplapped siding to be installed on parts of the house exterior.
Updated street view
External view of garage door
Garage door mechanism
The other major item progressed is the foul and soil water system. We dug the trenches for the underground pipes and have laid the 110mm diameter PVC pipes. At the correct places we have installed connectors for the sanitary fitting and rodding eye junctions. The pipes are laid to fall to the municipal sewer manhole at the roadside of the site. The municipal building inspector signed off on the work yesterday, so we have cemented to joint between the pipes and the manhole connection, and can now start backfilling the trench, which is more than 1.6m deep in places. Should be easier than it was to dig the trench!
The far end of the underground sewer pipes
The connection to the manhole, with a rodding eye pipe projecting from the trench

Tuesday, 27 March 2012

GO SLOW

It has been quiet on the house front for the last couple of weeks. Money has more or less dried up, and we are awaiting a home loan application approval before we can recommence in earnest. The loan application is somewhere in the innards of Nedbank's Home Loan division. It seems they don't know how to pigeon-hole the application as all the construction thus far has been cash funded. The bank bureaucrats are not sure which box to check: is it a Home Loan, a Building Loan, or Self-Build Loan? One would think that having built the structure with cash would ease the loan application process, but oh no, that would be too logical a conclusion to draw when one is dealing with [b]or[w]ankers. They don't seem to know what to do, endless to-ing and fro-ing. Hopefully they will make their minds up soon. So much for Nedbank's much vaunted “Ask Once” advertising promise....

In the meantime we have been doing a few small things ourselves. We have built a temporary staircase to ease access to the first floor. We have also started to fix the plywood sub-floor to the first floor joists. We are using 18mm pine shutterply. As part of our noise mitigation attempts, we are stapling strips of Airothene foam underlay to the tops of the joists, and screw fixing the shutterply over these strips. The Airothene should help to inhibit sound transmission through the timber structure to the rooms below. In addition, we will be filling the void above the ground floor ceiling with more acoustic insulation.
The temporary stairway to heaven
The Master Suite in waiting
18mm shutterply on Airothene on EcoBeam
Table Mountain from the first floor


Thursday, 8 March 2012

FIRST FLOOR JOISTS ARE UP

The EcoBeam joists arrived on site Tuesday, and we had them all up on Wednesday. They consist of 76x50mm top and bottom chords of Grade 5 treated pine wood, with a zig-zag galvanised steel web. This is a more technologically engineered solution than using solid timber joists. It combines the best characteristics of both wood and steel to create an exceptionally strong beam. It uses very little material compared to a solid joist, and the web voids allow for the very flexible insertion of electrical and plumbing services. The joists were bolted to the brick walls using galvanised steel truss hangers.


The EcoBeam joists are lightweight and easy to handle, and very economical to purchase. We have no hesitation is recommending this product. If you are planning a double storey house, please do not put up a concrete first floor structure. This is far more expensive, and the masses of cement used would increase the carbon footprint of your building substantially.  An EcoBeam floor structure will save you more than 50% on the cost of an equivalent prestressed concrete slab structure.

Monday, 27 February 2012

ROOFERS AT IT

The roofers started their work last week Thursday afternoon. As of this morning, they were about halfway, and are apparently under instruction from their boss to finish up today, whatever it takes. The roofers erect 76x50mm structural grade pine purlins over the rafters, with bracing where required by the engineer. They then attach Alububble insulation to the purlins with double sided tape. And the roof sheets are then screw fixed over this into the purlins.

The Alububble is a composite roll of bubble-wrap type white plastic insulating membrane with a foil lining on the upper side. This acts both as a water barrier in case of roof leakage, as well as an primary insulating membrane. We will supplement this insulation with further insulation above the ceiling boards.

The roof sheeting is formed from BlueScope Steel Colorbond Ultra steel in flat sheet roll form. It is then cut and pressed locally into IBR [inverted box rib] profile. The steel rolls come pre-coloured. We picked the White colour, for superior heat reflectivity. The steel is 0.53mm thick, and coated in a galvanising aluminium/zinc alloy with a coating mass of 200g/sq.m. The coloured paint is then bonded to the sheeting. The steel is imported in roll all the way from Australia, which is a pity. However, we were not prepared to purchase the locally produced Chromadek coloured galvanised steel sheeting produced by Mittal Steel, as it is widely held in the industry to be a vastly inferior product to the Colorbond. Environmentally, life cycle costs are just as important as initial build costs, so its a balancing act and a judgement call one has to make.

Roofing goes on while Table Mountain looks on
Interior view with Alububble underside visible

Wednesday, 22 February 2012

WAITING FOR THE ROOF

The roof rafters are up, and we have appointed A&A National roofing contractors to fit the roof sheets. So far, I am not impressed. They were due to start on Monday 20 February 2012, then it became Tuesday, then Wednesday [today]. I was contacted by them this morning to say they may only be on site after midday today, and perhaps only tomorrow [Thursday]. If I had known this ahead of time, I would have had the builder on site this week to finish up a few odds and ends.

The builder spent last week building in the timber roof rafters, and started screeding the floors. If it wasn't for the roofers messing with our scheduling, the builder could have finished the floor screeding this week.

In the meantime, we have appointed EcoBeam to supply our floor joists. Not only can they supply them in next to no time, they have significantly undercut their competition in quoted price. The joistS should be on site next week, and we are looking forward to getting the first floor structure up. Fingers crossed that the roofers finish up by Friday...... 
Rafters wating to be roofed
Rafter ends clipped due to flush eaves
First room has its screed