Wednesday, 14 November 2012

HARD SURFACE

Last week was paving week.  We selected Alternative Concrete as our paving contractor.  They specialise in exposed aggregate concrete paving.  Essentially, after preparing the ground, a specially formulated premix concrete is poured and levelled.  A retarder is then sprayed on the surface, which prevents the very top layer of cement in the concrete from setting.  The next day the pavers are back and remove the top layer of cement with water and hard brushes.  This exposes the aggregate stone in the concrete.  We selected a grey granite stone to go with the exterior colour scheme.  We used the exposed aggregate paving on the driveway, on the south side of the house, as well as on the patio around the swimming pool.
Compacted subsoil and formwork in place
The concrete has arrived...
Laying the concrete at the swimming pool
Pool patio complete
The new driveway
Yoda dismounts the new south patio

Thursday, 20 September 2012

THE MARSHMALLOW HOUSE

Koos and his team from PFC-Sprayfoam were back on site the last couple of days, applying their expanding closed cell spray foam insulation to the exterior of the brickwork. The insulation was sprayed inbetween the timber battens, directly onto the brickwork, to a minimum thickness of 25mm. This means that the walls can now act as an internal thermal mass, isolated from the external extremes of temperature. The house is now effectively watertight, draught proof, and very well insulated. We believe this to be the only house in Cape Town [perhaps in all of South Africa] which is insulated in this way and to this standard. The same sprayfoam insulates the roof, we have 50mm polystyrene insulation below the ground floor slab, and all windows are double glazed. We expect this home to be super comfortable in both hot and cold weather, no more need for air conditioning or heating!
Applying the sprayfoam insulation to the north elevation
The PFC Sprayfoam team at work
The south elevation nears completion
The Marshmallow House

Sunday, 9 September 2012

COOL POOL

The pool structure was completed this week. The concrete blocks were plastered with a waterproof plaster mixture, and this was then covered with a white swimming pool marbelite plaster. A 150mm strip of mosaic tiles was mounted at the waterline, and topped with a coping. We started filling the pool at 16h00 on Friday, and it was full by 14h00 on Saturday. The water meter shows that it took 32000 litres to fill. All we need now is for the weather to warm up a bit, and we can take a dip!
Friday 4PM, filling begins
Saturday 2PM, 32000 litres later


Wednesday, 29 August 2012

FORWARD PLANNING FOR A DIP

With the worst of winter behind us and summer approaching, the time is opportune to begin work on the swimming pool. The pool will have an internal length of 10m, and a width of 2.6m, with steps to one side of easy access and egress. The hole was excavated by hand, and the excess soil distributed over the site. Thereafter, a steel mesh was laid on the pool floor with steel reinforcing bar bent and tied to the mesh to form a ring of risers at 200mm centres. A 200mm thick concrete slab was poured over the mesh, and once set, construction of the pool walls began. The walls were built of 190mm wide concrete blocks, which were threaded over the steel reinforcing risers. Once the walls were built, concrete was poured into to the concrete block cavities to tie the entire structure together. All concrete and mortar mixes had a liquid waterproofing compound added to ensure that the structure is watertight. 
The big hole, soon to be the swimming pool
Pool walls built
The built in braai/BBQ structure has also been built. First the foundation walls for the structure and the Pool Pavilion room were built. The infill under the slab was compacted, and a damp proof membrane laid over. This was topped by 40mm rigid foam insulation, and a 100mm concrete ground floor slab. The braai/BBQ structure was then built up, and topped with a cylindrical fibre cement flue. We are currently awaiting the delivery of the cowl to top the flue.
Insulation goes down before the slab pour
The braai/BBQ structure topped with the cylindrical flue

Thursday, 26 July 2012

STEPPING UP A GEAR

A lot has been going on lately at the site. Firstly, we've made a start on tiling one of the upstairs bathrooms. We started by 18mm putting ply sheets in between and level with the tops of the floor joists, and covered this with a layer of 12mm fibre cement board. We put a cement screed to fall over this on the shower floor, and built the rest of the bathroom floor up with 18mm plyboard and another layer of 12mm fire cement board. 12mm fibre cement boards were also fixed to the timber stud bathroom walls. The entire floor, as well as the shower walls were then tanked using a bituminous product called Tilesafe, which is applied using a neoprene primer. Glass mosaic tiles were then laid on the floor, and we've made a start on the granite tiles affixed to the walls. All tiles were fixed using Tal Marbleflex, a flexible waterproof tile adhesive.
Ply inbetween the joists...
...covered with 12mm fibre cement board [note the shower drain]
Granite over Tilesafe on the walls, glass mosaic on the floor
RELIEF: Modern conveniences arrive on site
 Out front we also started on the gate structures. These consist of a galvanised steel structure, clad on the outside with vertical wood decking planks. The galvanised steel structure was manufactured and installed by a gate specialist. It consists of a pedestrian gate and fixed fence to one side, and a sliding vehicular gate to the other side. We have since started rivet fixing the decking planks to the steel gate structure. The decking planks are machined from locally grown radiata pine, and pressure treated with a CCA preservative. The pine is FSC certified, and we have gone to great lengths to avoid using any tropical hardwoods in this house. We oiled the planks with two coats of a “teak” coloured preserving oil to provide additional protection, and to improve the colour of the treated pine.
Front gates on a misty morning
Gate close-up

Oops, how did that get in here?  Sparky and Rusty, two new family additions
We are currently making use of our builder Derek on site again. His has fixed pine battens [38x38mm] at 600mm centres to the north and south walls of the house, to enable the shiplap cladding planks to go up. Derek's team also put up one of the main architectural features of the house, the pre-coloured alu-zinc flashings around the upstairs windows on the north side of the house. I am sure you'll agree that it totally transforms the appearance of the house.
North side, with cladding battens and window surround
South side with cladding battens up
The shiplap cladding planks lie in wait
Derek and his team are currently busy laying foundation for the Pool Pavillion on the north side of the house. This will provide a third reception area in the house, and will eventually house a built in braai/BBQ with a strong focus on the swimming pool.
Pool Pavillion foundation trenches
And last but certainly not least, we are very lucky and grateful to have had the assistance of Joe and Margaret who are visiting all the way from Ireland. Many thanks indeed! We could never have done this much in as little time without your invaluable help!

Tuesday, 10 July 2012

ICING ON THE UNDERSIDE

We've been toying with a number of solutions for insulating our metal sheet roof. We've thought of polyester fibre rolls, blown in cellulose, and polystyrene. But all these options create problems in terms of difficulty of installation and continuity of thermal break. We finally settled on polyurethane foam spray. We found a local installer, PFC-Sprayfoam, and two days later, they were on site and working away. The whole job only took a few hours.

Basically, they arrive with a van containing the equipment, and a generator on a trailer behind. In simple terms, the spray foam is applied by mixing two chemical compounds, which react with each other and the atmosphere and begin expanding to many times their original volume. This applied foam hardens to an extremely effective closed cell insulating layer which is also completely watertight. It also [very importantly] renders the roof and its connections to the walls effectively airtight, eliminating drafts and associated heat loss/gain, something very critical to thermal performance which is often overlooked in roof structures.
The van, trailer, and heated pipe carrying the foam insulation
The generator, and the two drums of chemicals which make up the foam
The reactor which prepares and pumps the chemicals
 The van contains the 2 drums of chemical product, as well as a reactor which prepares the chemicals at the correct temperature. From here they were pumped separately along a 60m long heated hose into the house. The chemicals are only mixed in the spray nozzle as they are applied to the surface. The insulation as applied to the underside of our roof has made a massive impact on regulating the interior temperature of the house already. We intend to apply the polyurethane spray foam to the exterior surface of our brick walls as well, before they receive their cladding, in order to create a super-insulated house with a high internal thermal mass.
Application of the sprayfoam insulation begins
The finished product
We recommend this product without any reservations. It is the perfect solution for insulation your house's roof, while at the same time rendering it air and watertight. Contact Koos from PFC-Sprayfoam on +27(0)83 234 8978 for a quote. This product means you don't even need a membrane under you metal sheet or concrete tiled roof. The spray foam is applied and adheres directly to the underside of the roofing material, sealing every nook and cranny. Your roof space will become completely dust proof and air tight. Elegantly simple.

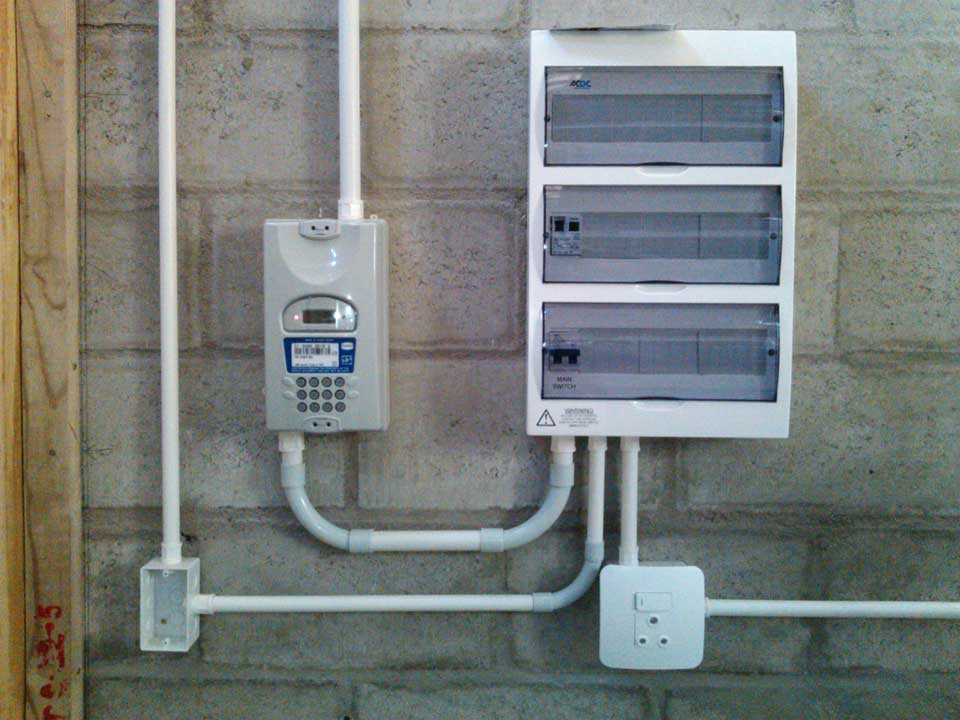
Since our last update we have also has the electricity finally connected up, with a pre-paid electicity meter installed by the utility, Eskom.
The start of the distribution board...
This is what our pre-paid electicity meter looks like
PS. The satellite dish has also gone up. Rather than a boring, generic eyesore in a prominent location, we decided to decorate the dish and spread a little sunshine to passers by. Hope you like it!
Smile!
Happy dish

Tuesday, 5 June 2012

WINDOWS!

It has been a while since our last update. But a few things have been done which make a huge difference to the house. First off, the site has been cleared of building rubble, and mostly levelled. Second, we have connected up most of the waste pipes and brought them into the building. Thirdly, our initial electrical installation is complete and ready for temporary certification, with the switch board and 1 socket circuit complete.

And last but definitely not least, our windows and doors are in! We have installed double glazed tilt-and-turn uPVC windows and sliding doors. They are manufactured locally from Turkish uPVC profiles and German locking hardware. The manufacturers, Tecnoplas, also make the double glazing units in-house. Although Tecnoplas appeared to have a few logistical problems, which caused very long delays in getting the windows installed, the end product is of a high quality and well worth the wait. Now that the building is closed up, we can finally commence with the interior fitout.
First part of the electrical intallation in the garage
Windows, electrics and poo-pipes on the south side
Is it my imagination, or does the front elevation......
....bear a striking resemblance to Henry the vacuum?
Sliding doors, windows, and front door on the north side
Tilt-and-turn windows: closed......
.......and open.